上海电信 IPTV 组播转单播

最近搞了一套NAS,搭建了在家里的影音库EMBY,发现可以支持播放电视节目,正好家里的IPTV机顶盒坏了,于是就折腾了一下 UDPXY 来实现单播任意设备观看IPTV。

秉承在多年IDC行业工作的经验,网络架构尽可能简单,不要使用各种二层Bridge。因此本篇文章会使用 ROSv7 新特性 Docker来实现目标。

准备材料:

  1. Mikrotik RouterOSv7 (开启Container)
  2. udpxy 的包
  3. 上海电信节目单

开始操作:

桥接 VLAN85

我这边是用 RouterOS进行拨号的,在IPTV光猫中把VLAN85继承给LAN口1

在ROS上配置 VLAN85

配置Docker,veth

将 veth 加入到 Bridge 中

配置 IP 在 Bridge上

新建Docker

udpxy

开启 IGMP Proxy

在 Routing -> IGMP Proxy 下新建两个 Interface

vlan85的 Alternative Subnets 需要填写 0.0.0.0/0

运行 Docker 后,查看 udpxy 的status

下载上海电信的 M3U 替换成单播地址

格式如下:

http://单播地址:4022/udp/组播地址

举例说明:

#EXTINF: -1 tvg-id="cctv-1" tvg-name="CCTV-1(综合)" group-title="央视频道", CCTV-综合「高清」
rtp://239.45.3.145:5140

转换成

#EXTINF: -1 tvg-id="cctv-1" tvg-name="CCTV-1(综合)" group-title="央视频道", CCTV-综合「高清」
http://192.168.201.2:4022/udp/239.45.3.145:5140

这个时候就可以用内网中任意一台设备观看上海电信 IPTV 了

Bird 构建自己的 Anycast 网络

首先你需要:

  1. 一家可以让你跑 BGP 的服务商,这边推荐这两家 VultrMisaka
  2. 一段有RPKI+IRR的 IPv4 , IPv6我建议你别跑Anycast了,调起来头大
  3. 一个自己的ASN

安装bird:

系统我推荐使用debian 10,安装bird 只需要

apt install bird -y

设置开机自启动

systemctl enable bird

修改bird 配置

这边贴一个配置文件供参考

#定义 router ID
router id 100.127.70.25; 
#定义自有网络,这是filter policy
function is_own_network() {
  return net ~ [
    10.0.0.0/22{22,24}     # Anycast DNS
  ];
}

# The Kernel protocol is not a real routing protocol. Instead of communicating
# with other routers in the network, it performs synchronization of BIRD's
# routing tables with the OS kernel.
protocol kernel {
        scan time 60;
        import none;
#       export all;   # Actually insert routes into the kernel routing table
}

# The Device protocol is not a real routing protocol. It doesn't generate any
# routes and it only serves as a module for getting information about network
# interfaces from the kernel. 
protocol device {
        scan time 60;
}

protocol static static4 {
  route 10.0.0.0/24 reject;
}

protocol bgp vultr
{
    # substitute with your AS or Vultr's private AS
    local as xxxx;
    import all;
    export filter {
    if is_own_network() && source ~ [RTS_STATIC, RTS_BGP] then {
      accept;
    }
    reject;
    };
    graceful restart on;
    multihop 2;
    neighbor 169.254.169.254 as 64515;
    password "";
}

上面的配置文件我简单讲一下几个点,Vultr官方给出的配置文件是export all,其实这种对于网络架构来说非常不负责任,你这样100%会导致路由侧漏从而引起BGP Session被掐断。所以我写了一个定义来确保不会漏别人的路由给上游。

如果你想要使用一些community(其实在Anycast中是必须要的)来修改路径的话,你可以在 protocol static static4 下改,可以参考下图:

route 10.0.0.0/24 reject {
    bgp_community.add((48024,666));
    bgp_community.add((48024,6666));

注意一下,一行一个,并且和cisco不一样的地方是他是用,而不是:的。

community也可以定义,可以自己去研究下

[Cisco]从零开始设计运营商级community (上)

首先,我对网络这块完全是从网上自学的,如果有不对的地方,还请您谅解。

其次,这篇文章是根据小狼大佬的文章而改写的,原文在这里

我只是在 Cisco/FRRouting 平台上再一次实现了这些东西,本质思路都是小狼大佬交给我的。

因此本篇文章将大量引用小狼大佬的原文,他的解释比我更通俗易懂。

我们都知道 IDC 需要使用 BGP 协议来与上游交换路由表和发送自己的 IP Prefix,而且可以通过 BGP 来对路由属性对自己和客户的网段进行修改以达到控制路径的效果。但是有多少人知道其实 BGP 可以使用 community 来实现非常方便的路由路径调整呢?这篇文章将讲述如何使用 community 来打造适合机房的路由控制方案。

要想知道如何使用 BGP community,我们则先需要了解一下 BGP 的属性。

BGP 的属性分以下几种类型,分别是公认必遵,公认自决,可选可过渡,可选不可过渡。而这些属性又有属于他们不同的特点。

公认必遵(Well-Known Mandatory)是所有路由器都必须识别的属性,且这些属性必须出现在路由描述中并传递给 BGP 邻居。公认必遵的属性有以下几个:

  • ORIGIN(起源):这个属性说明了源路由是怎样放到 BGP 表中的。 在路由选择的时候,ORIGIN中,IGP优于EGP,EGP优于INCOMPLETE。
  • AS_PATH(AS路径):指出包含在 UPDATE 报文中的路由信息所经过的自治系统的序列。
  • Next_HOP (下一跳)声明路由器所获得的BGP路由的下一跳,对 eBGP 会话来说,下一跳就是通告该路由的邻居路由器的源地址。

公认自决(Well-Known Discretionary)也是所有路由器必须识别的属性,但是可以让路由器自己决定该属性需不需要传递,以及出不出现在路由描述中。公认自决的属性有以下几个:

  • LOCAL_PREF (本地优先级): 仅在IBGP对等体之间交换,不通告给其他AS。当BGP的路由器通过不同的IBGP对等体得到目的地址相同但下一跳不同的多条路由时,将优先选择LOCAL_PREF属性值较高的路由。
  • ATOMIC_AGGREGATE (原子聚合):原子聚合属性指出已被丢失了的信息。

可选可过渡(Optional Transitive) 与 可选不可过渡(Optional Nontransitive)并不要求所有运行BGP协议的系统都识别。如果属性是可选过渡的,那么,即使运行BGP的系统不能识别该属性,也要接受该属性并将其转发给它的对等体。而如果属性是可选不可过渡的,运行BGP的系统可以忽略包含该属性的消息并且不向它的对等体转发。 这两种类型的属性分别有以下几个:

  • COMMUNITY(团体) 是一组共享相同属性的目的地集合, 用来简化路由策略的应用和降低维护管理的难度,没有物理上的边界,与其所在的AS无关。
  • AGGREGATOR(聚合者) 该属性补充了路由信息在哪里丢失——它包含了发起路由聚合的AS号码和形成聚合路由的BGP发布者的IP地址。
  • MULTI_EXIT_DISC(多出口区分)被用来区分同一个邻接AS的多个接口。
  • ORIGINATOR_ID(起源ID) 用于标识路由反射器,防止引入路由反射器之后出现环路,增加ORIGINATOR_ID这个属性来标识,反射器在发布路由时加入ORIGINATOR_ID,当反射器收到的路由信息中的ORIGINATOR_ID就是自己的ROUTER_ID时,就可以发现路由环路的出现,将该路由丢弃,不再转发。
  • CLUSTER_LIST(簇列表) 用于标识路由反射器组 ,也是用来防止环路,在路由经过路由反射器时路由反射器会将自己的CLUSTER_ID添加到路由携带的CLUSTER_LIST中,当路由反射器发现接收的路由的CLUSTER_LIST中包含有自己的CLUSTER_ID,则将该路由丢弃,不再转发。

那么我们很清楚的看到了,公认属性已经被定义好了该属性所应发挥的作用,我们无法对其进行个性化修改来实现自己想要的效果。而可选属性大部分都是在多出口选路用以及网络内存在路由反射器 (Route reflector) 对其进行标识以起到防环的作用。而唯一的可自定义的属性则是 COMMUNITY(团体)属性了。要使用 COMMUNITY 来对路由路径进行控制,我们得先了解下该属性的定义。

团体属性可以添加在每一个路由前缀中,由RFC1997定义,是一个transitive optional属性。包含有团体属性的路由,表示该路由是一个路由团体中的一员,该路由团体具有某种或多种相同的特征。根据这些特征区分不同的路由,可以大大简化路由策略的配置工作,同时也增强路由策略的能力。

ref: 新华三技术官网

我们可以预先定义 community 来标识路由并管理路由。但是在这之前,我们需要一个 BGP 网络来进行操作。那么我们就先开始搭建一个数据中心的网络吧!

以上是原文,希望到这里你能理解我们要干什么,接着看下去。

设计一个网络,我建议你是老老实实画一张拓扑图,然后跟着这个拓扑图来构建网络。我太懒了不想操作,这里就脑内生成一张拓扑,直接做community-list的构建表。

我们有7个主要的数据中心,分别是香港,新加坡,东京,首尔,西雅图,阿什本以及法兰克福。

其中,香港,新加坡,东京,首尔均为Cisco平台,而西雅图,阿什本和法兰克福则是FRRouting平台,语法其实差不了多少。

路由类型控制标识功能描述备注
HKIX 禁播48024:30010不要将路由发送给 HKIX
HKIX 禁播48024:30020不要将路由发送给 HKIX ALIYUN
HKIX 禁播48024:30030不要将路由发送给 HKIX TENCENT
Transit 禁播48024:4001x操控发送给 HE 的路由x=0 禁播 1,2,3 为prepend次数
Transit 禁播48024:4002x操控发送给 CDN77 的路由x=0 禁播 1,2,3 为prepend次数
上游Transit 禁播48024:6001x特殊 community,操控Level3x=0 禁播 1,2,3 为prepend次数
上游Transit 禁播48024:6002x特殊 community,操控GTTx=0 禁播 1,2,3 为prepend次数
上游Transit 禁播48024:6003xx=0 禁播 1,2,3 为prepend次数
上游Transit 禁播48024:6004x特殊 community,操控CoreBackbonex=0 禁播 1,2,3 为prepend次数
上游Transit 禁播48024:6005x特殊 community,操控Cogentx=0 禁播 1,2,3 为prepend次数
上游Transit 禁播48024:6006x特殊 community,操控NTTx=0 禁播 1,2,3 为prepend次数
上游Transit 禁播48024:6007x特殊 community,操控TATAx=0 禁播 1,2,3 为prepend次数
上游Transit 禁播48024:6008x特殊 community,操控RETNx=0 禁播 1,2,3 为prepend次数
上游Transit 禁播48024:6009x特殊 community,操控UPCx=0 禁播 1,2,3 为prepend次数
上游Transit 禁播48024:6010x特殊 community,操控Sparklex=0 禁播 1,2,3 为prepend次数
上游Transit 禁播48024:6011x特殊 community,操控Teliax=0 禁播 1,2,3 为prepend次数
上游Transit 禁播48024:6012x特殊 community,操控Comcastx=0 禁播 1,2,3 为prepend次数
上游Transit 禁播48024:6013x
上游Transit 禁播48024:6014x
上游Transit 禁播48024:6015x
上游Transit 禁播48024:6016x特殊 community,操控NMEx=0 禁播 1,2,3 为prepend次数
上游Transit 禁播48024:6017x
上游Transit 禁播48024:6018x
上游Transit 禁播48024:6019x特殊 community,操控Telefonicax=0 禁播 1,2,3 为prepend次数
上游Transit 禁播48024:6020x特殊 community,操控Vodafonex=0 禁播 1,2,3 为prepend次数
上游Transit 禁播48024:6021x特殊 community,操控PCCWx=0 禁播 1,2,3 为prepend次数
上游Transit 禁播48024:6022x
上游Transit 禁播48024:6023x
上游Transit 禁播48024:6024x特殊 community,操控Coloaux=0 禁播 1,2,3 为prepend次数
上游Transit 禁播48024:6025x特殊 community,操控Serversaustraliax=0 禁播 1,2,3 为prepend次数
上游Transit 禁播48024:6026x特殊 community,操控Orangex=0 禁播 1,2,3 为prepend次数
内部用 community48024:999匹配上该 community,则向上游发送路由
内部用 community48024:666匹配上该 community,则向上游发送黑洞网内禁播 /32 only
内部用 community48024:1000匹配上该 community,则禁播no-export
内部用 community48024:1001匹配上该 community,则prepend 1次as-path prepend 48024
内部用 community48024:1002匹配上该 community,则prepend 2次as-path prepend 48024 48024
内部用 community48024:1003匹配上该 community,则prepend 3次as-path prepend 48024 48024 48024
内部用 community48024:2100匹配上该 community,则香港禁播
内部用 community48024:2101匹配上该 community,则香港prepend 1次
内部用 community48024:2102匹配上该 community,则香港prepend 2次
内部用 community48024:2103匹配上该 community,则香港prepend 3次
内部用 community48024:2200匹配上该 community,则新加坡禁播
内部用 community48024:2201匹配上该 community,则新加坡prepend 1次
内部用 community48024:2202匹配上该 community,则新加坡prepend 2次
内部用 community48024:2203匹配上该 community,则新加坡prepend 3次
内部用 community48024:2300匹配上该 community,则东京禁播
内部用 community48024:2301匹配上该 community,则东京prepend 1次
内部用 community48024:2302匹配上该 community,则东京prepend 2次
内部用 community48024:2303匹配上该 community,则东京prepend 3次
内部用 community48024:2600匹配上该 community,则首尔禁播
内部用 community48024:2601匹配上该 community,则首尔prepend 1次
内部用 community48024:2602匹配上该 community,则首尔prepend 2次
内部用 community48024:2603匹配上该 community,则首尔prepend 3次
内部用 community48024:3300匹配上该 community,则西雅图禁播
内部用 community48024:3301匹配上该 community,则西雅图prepend 1次
内部用 community48024:3302匹配上该 community,则西雅图prepend 2次
内部用 community48024:3303匹配上该 community,则西雅图prepend 3次
内部用 community48024:3900匹配上该 community,则阿什本禁播
内部用 community48024:3901匹配上该 community,则阿什本prepend 1次
内部用 community48024:3902匹配上该 community,则阿什本prepend 2次
内部用 community48024:3903匹配上该 community,则阿什本prepend 3次
内部用 community48024:4100匹配上该 community,则法兰克福禁播
内部用 community48024:4101匹配上该 community,则法兰克福prepend 1次
内部用 community48024:4102匹配上该 community,则法兰克福prepend 2次
内部用 community48024:4103匹配上该 community,则法兰克福prepend 3次

在一番复制粘贴后,我的community-list构建好了。这里解释一下,我们香港有自己拉的HKIX和HE,其他Transit则是cdn77提供的,而cdn77有很多内部用的community,而我又不想提供给客户这些参数,于是就自己造community然后翻译成cdn77的community发出去。

Cisco 平台这些 community-list 的命令如下

ip community-list standard no-export-hkix permit 48024:30010
ip community-list standard no-export-hkix-aliyun permit 48024:30020
ip community-list standard no-export-hkix-aliyun permit 48024:30030
ip community-list standard no-export-he permit 48024:40010
ip community-list standard prepend1x-he permit 48024:40011
ip community-list standard prepend2x-he permit 48024:40012
ip community-list standard prepend3x-he permit 48024:40013
ip community-list standard no-export-cdn77 permit 48024:40020
ip community-list standard prepend1x-cdn77 permit 48024:40021
ip community-list standard prepend2x-cdn77 permit 48024:40022
ip community-list standard prepend3x-cdn77 permit 48024:40023
ip community-list standard no-export-cdn77-level3 permit 48024:60010
ip community-list standard no-export-cdn77-gtt permit 48024:60020
ip community-list standard no-export-cdn77-corebackbone permit 48024:60040
ip community-list standard no-export-cdn77-cogent permit 48024:60050
ip community-list standard no-export-cdn77-ntt permit 48024:60060
ip community-list standard no-export-cdn77-tata permit 48024:60070
ip community-list standard no-export-cdn77-retn permit 48024:60080
ip community-list standard no-export-cdn77-upc permit 48024:60090
ip community-list standard no-export-cdn77-sparkle permit 48024:60100
ip community-list standard no-export-cdn77-telia permit 48024:60110
ip community-list standard no-export-cdn77-comcast permit 48024:60120
ip community-list standard no-export-cdn77-nme permit 48024:60160
ip community-list standard no-export-cdn77-telefonica permit 48024:60190
ip community-list standard no-export-cdn77-vodafone permit 48024:60200
ip community-list standard no-export-cdn77-pccw permit 48024:60210
ip community-list standard no-export-cdn77-coloau permit 48024:60240
ip community-list standard no-export-cdn77-serversaustralia permit 48024:60250
ip community-list standard no-export-cdn77-orange permit 48024:60260
ip community-list standard nerocloud-rtbh permit 48024:666
ip community-list standard no-export permit 48024:1000
ip community-list standard prepend1x-nerocloud permit 48024:1001
ip community-list standard prepend2x-nerocloud permit 48024:1002
ip community-list standard prepend3x-nerocloud permit 48024:1003

这里因为偷懒,我把cdn77的prepend参数给忽略了。

做到这里,你已经基本上成功一半了,接下来就是写route-map来匹配上这些community然后执行动作。

具体的一个流程大概如下:

客户发送NeroCloud内部的communities,我们的Router收到了,然后匹配,再将匹配到的community做相应的动作,最后发给上游。

因此我们的community转接操作是在内部的import上做的,这里先写一个rtbh黑洞来做示范。

route-map nerocloud-import permit 10 
 match community nerocloud-rtbh
 set ip next-hop xx.xx.xx.xx
 set community 3491:999 4635:666 6939:666 additive
 continue 20
route-map nerocloud-import permit 20 

ip route xx.xx.xx.xx 255.255.255.255 Null0

解释一下:

我们的rtbh是 48024:666,当客户发这个community时,我们网内应该将被攻击的IP封禁,set ip next-hop xx.xx.xx.xx 就是将被攻击的 IP丢到下一跳(并不真实存在的)然后再把这个网关加到NULL0上,就能在网内屏蔽这个/32 IP。

但是如果仅仅是网内封禁是不够的,因为流量还是会通过我们的路由器,造成网内拥塞。因此我们需要拿到上游运营商的rtbh,将/32 blackhole发送至骨干网上,这样就不会有问题了。

我们的上游 PCCW,HKIX和HE,他们的rtbh分别是 3491:999 4635:666 6939:666,因此我们需要一个action就是 set community 3491:999 4635:666 6939:666 additive。这么做可以将我们的路由带上这些community并发送给上游。

验证一下配置:

在没有发送 48024:666 的时候

外网

都是正常可达的,我们在日本的路由器上发送内部rtbh指令,看看会发生什么。

网内已经不可达了
而网外因为需要发送改给运营商的rtbh,因此会延迟一点。

使用 Mikrotik 解锁本地限定流媒体/网站

目前来看,这套方案整体稳定性不佳,我目前只用来解锁AbemaTV的流视频,而其他的流媒体或者网站类似 DMM,Netflix之类的因为封锁不算非常严格,因此可以通过购买一些特殊的服务器来解决。

在操作之前,请先确保你对 Mikrotik RouterOS这个系统有一定了解,并且需要精通 Linux 系统中路由表这一块。

阅读全文→

MacBook Pro 16inch (2019) 入手体验及配件心得

我之前的一台 MacBook Pro 是 2015 年的 13 inch 的顶配 512 GB SSD,但是只有8G 内存,而且没有独立显卡。五年过去了,那台老 MacBook Pro 已经完全不能胜任我的日常需求了。这次寒假在家里待的时间有点久,先买了台2019款的iMac 27inch 5k,但是总觉得一定要买一台 MacBook Pro才行。于是在半个月后,我入手了 MacBook Pro 16inch。

我的 MacBook Pro的配置是MVVK2这个型号,2.3Ghz的i9-9880H,16GB 内存,AMD Radeon Pro 5500M 4 GB和1TB SSD。

在买之前我是看过很多评测的,我根据自己的需要选择了i9这款而不i7这款,因为我不想重蹈之前New MacBook的覆辙,我的预算对于这两款配置的乞丐版都是充足的,所以我选择了VK2。

原本是准备通过 Apple 的教育商店下单的,但是无奈选错了配置,而他又不是实时退款的,因此只好在淘宝一家店下单买了。

店家发货很快,仅仅用了两天就送到我手上了。早上起来下楼的时候看到这个快递被物业直接丢在家门口。。我的内心其实是崩溃的。

拆机后走完苹果的激活程序,就开始体验了。首先我用 Intel 的 Power Gadget 测试了一下 CPU的睿频和散热情况。i9 单核心4.8Ghz可以稳定睿频,而全核心睿频也保持在4.0Ghz不降频。不过这都是理想状态,实际使用的时候肯定是会比这个数字低一点的。

顺便跑了一下R15,跑分有3000分,比2019的iMac 5k还高了1000分。虽然跑到后面是过热降频了,但是总体而言还是很满意的。

阅读全文→

解决 Windows10 锁屏无法修改

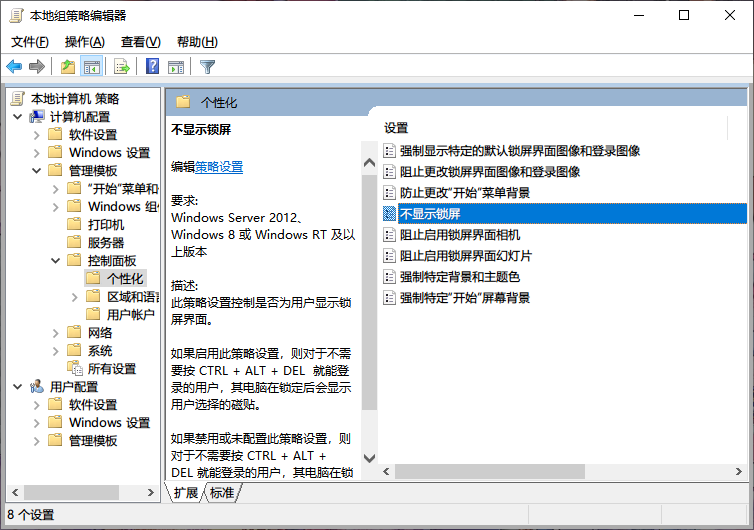
如上图所示,我的 Windows 锁屏无法修改,Google了一下,发现是需要改系统组策略。

  1. WIN+R,然后输入 gpedit.msc 打开组策略;
  2. 在左侧依次展开:计算机配置 -> 管理模版 -> 控制面板 -> 个性化
  3. 在右侧双击打开“不显示锁屏”,弹出窗口中选“未配置”,应用,确定。如果默认为“未配置”先改为“禁用”,应用,再改回“未配置”-“确定”即可。

然后重新打开这个页面,就可以修改锁屏界面了。

2018 11-inch iPad Pro 双十一入手体验

1. iPad Pro 购买渠道及体验

避免广告嫌疑,因此所有的店铺都不会写出来,也不做推荐,我怕我买了没翻车你买翻车到时候来找我麻烦(

我入手2018版11-inch iPad Pro是在2019的11月7日,没错是9102年。。。因为现在我目前还是一个无稳定收入的穷学生,之前国庆的时候在七宝专卖店入手了一台iPhone 11 128G,又买了一块Apple Watch 5,因此只能选择了在深水宝上购买而不是去苹果专卖店选购。

周五上课的时候看了下同学的iPad 2018,他是类纸模+Apple Pencil 1代,搭配Notability记笔记,抢来试用了一下,那感觉就直接惊艳到我了,因此下定决心准备买个iPad。 其实之前一直想买iPad Air3,毕竟iPad Air3 今年年初才刚更新过,更新换代可能没有那么快。 查看深水宝之后发现,iPad Air3卖的价格只比官方便宜800块,而我看中的 11-inch iPad Pro 要便宜3000左右,最后我选择的是WiFi+4G版本,256G空间,奇怪的是店铺没有让我选择颜色,可能是随机发货吧,也没细问,反正肯定是要买保护套的,颜色对我而言并不是那么重要。

官网的定价 8669
阅读全文→

CentOS 使用 Quagga 实现 OSPF 组播

OSPF(Open Shortest Path First开放式最短路径优先)是一个内部网关协议(Interior Gateway Protocol,简称IGP),用于在单一自治系统(autonomous system,AS)内决策路由。是对链路状态路由协议的一种实现,隶属内部网关协议(IGP),故运作于自治系统内部。著名的迪克斯加算法(Dijkstra)被用来计算最短路径树。OSPF分为OSPFv2和OSPFv3两个版本,其中OSPFv2用在IPv4网络,OSPFv3用在IPv6网络。OSPFv2是由RFC 2328定义的,OSPFv3是由RFC 5340定义的。与RIP相比,OSPF是链路状态协议,而RIP是距离矢量协议。

本教程中,我们将连接通过Wireguard连接的路由器网络,Route A(上海)下挂载 10.200.10.0/24,而 Route B(江苏)下挂载 172.16.5.0/24。

首先,我的配置可能并不适合你,只是作一个借鉴作用,而我本人是通过这篇教程来实现的,过程并不一样,写下希望以后不要忘记。

建立 GRE 隧道

我一开始是没用使用 GRE 而直接使用 Wireguard 进行互联的,但是发现收不到 OSPF 路由,在 Allowed-IPs 已经是 0/0 的情况下,猜想可能是不支持收发广播包(240/8)。因此在Wireguard的基础上使用了 GRE Tunnel,即 GRE Over Wireguard 实现。

实现过程

vim /etc/sysconfig/network-scripts/ifcfg-tun0

贴入以下内容

DEVICE=tun0
BOOTPROTO=none
ONBOOT=no
TYPE=GRE
PEER_OUTER_IPADDR=10.200.10.1  #对端IP (wireguard)
PEER_INNER_IPADDR=192.168.200.1 
MY_INNER_IPADDR=192.168.200.2 (GRE本机IP)

然后 ifup tun0

同理在另一台机器上贴入以下内容

DEVICE=tun0
BOOTPROTO=none
ONBOOT=no
TYPE=GRE
PEER_OUTER_IPADDR=10.200.10.2  #对端IP (wireguard)
PEER_INNER_IPADDR=192.168.200.2 
MY_INNER_IPADDR=192.168.200.1 (GRE本机IP)

然后 ifup tun0

ping 对端的 GRE IP进行测试,如果通了那么这里就算完成了。

安装 Quagga

通过 yum 安装 Quagga

yum -y install quagga 

关闭 SELINUX 的话可以跳过这一步

setsebool -P zebra_write_config 1

配置 Zebra

我们首先创建Zebra配置文件,并启用Zebra守护进程。

rm -f /etc/quagga/zebra.conf
cp /usr/share/doc/quagga-*/zebra.conf.sample /etc/quagga/zebra.conf
systemctl start zebra 
systemctl enable zebra

启动vtysh命令行:

vtysh 

首先,我们为Zebra配置日志文件。输入下面的命令进入vtysh的全局配置模式:

site-A-RTR# configure terminal

指定日志文件位置,接着退出模式:

site-A-RTR(config)# log file /var/log/quagga/quagga.log
site-A-RTR(config)# exit

永久保存配置:

site-A-RTR# write

由于我们使用的是 GRE Tunnel,因此不需要为 Interface 重新配置 IP,直接可以进行 OSPF 的设置。如果你是通过物理线进行的连接而没有分配指定的 IP ,可以通过我之前提到的那个教程去学习。

配置OSPF

我们首先创建OSPF配置文件,并启动OSPF守护进程:

rm -f /etc/quagga/ospfd.conf
cp /usr/share/doc/quagga-*/ospfd.conf.sample /etc/quagga/ospfd.conf 
systemctl start ospfd
systemctl enable ospfd
chown quagga:quagga -R /etc/quagga/

现在启动vtysh命令行来继续OSPF配置:

vtysh

输入路由配置模式:

site-A-RTR# configure terminal
site-A-RTR(config)# router ospf

可选配置路由id:

site-A-RTR(config-router)# router-id 192.168.200.1

添加在OSPF中的网络:

site-A-RTR(config-router)# network 192.168.200.2/32 area 0
site-A-RTR(config-router)# network 10.200.10.0/24 area 0

永久保存配置:

site-A-RTR(config-router)# do write

在镇江的机器上重复和上面相似的OSPF配置:

输入路由配置模式:

site-B-RTR# configure terminal
site-B-RTR(config)# router ospf

可选配置路由id:

site-B-RTR(config-router)# router-id 192.168.200.2
site-B-RTR(config-router)# network 192.168.200.1/32 area 0
site-B-RTR(config-router)# network 172.16.5.0/24 area 0
site-B-RTR(config-router)# do write 

OSPF的邻居现在应该启动了。只要ospfd在运行,通过vtysh的任何OSPF相关配置的改变都会立即生效而不必重启ospfd。

验证

1.通过ping测试

首先你应该可以从site-A ping同site-B的LAN子网。确保你的防火墙没有阻止ping的流量。

[root@site-A-RTR ~]# ping 172.16.5.1

2. 检查路由表

必要的路由应该同时出现在内核与Quagga理由表中。

[root@site-A-RTR ~]# ip route 

10.200.10.0/24 dev wg-client proto kernel scope link src 10.200.10.1 
172.16.5.0/24 via 192.168.200.2 dev tun-zj proto zebra metric 20 
192.168.200.2 dev tun-zj proto kernel scope link src 192.168.200.1

[root@site-A-RTR ~]# vtysh
site-A-RTR# show ip route 

Codes: K - kernel route, C - connected, S - static, R - RIP, O - OSPF,
       I - ISIS, B - BGP, > - selected route, * - FIB route

O   10.200.10.0/24 [110/10] is directly connected, wg-client, 01:03:54
O>* 172.16.5.0/24 [110/20] via 192.168.200.2, tun-zj, 01:00:20
O   192.168.200.2/32 [110/10] is directly connected, tun-zj, 01:04:11
C>* 192.168.200.2/32 is directly connected, tun-zj

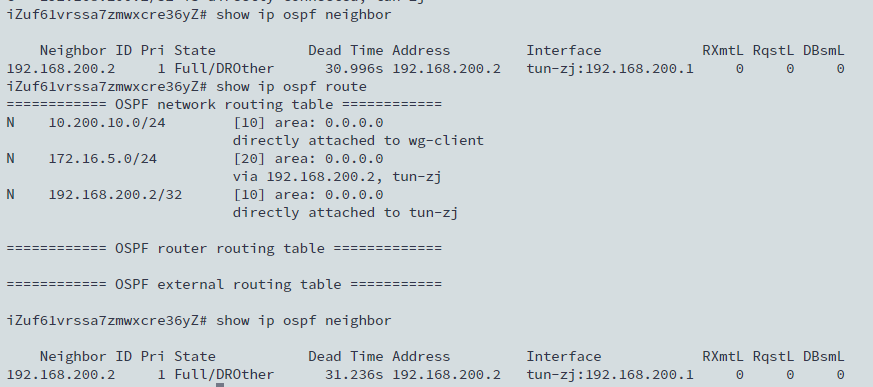
3. 验证OSPF邻居和路由

在vtysh命令行中,你可以检查必要的邻居是否在线与是否已经学习了合适的路由。

[root@site-A-RTR ~]# vtysh 
site-A-RTR# show ip ospf neighbor


CentOS 搭建CSGO服务器

最近有一些空闲的服务器要搭建 CSGO 服务器,综合一位前辈的文章,进行了一些总结和优化

由于我不会用 Windows 或者其他 Linux 系系统,因此这只写如何在 CentOS 7 64bit 上搭建 CSGO 服务器。

基础准备

CentOS 7 64bit

30G 硬盘

5Mbps+ 带宽

一个服务器令牌

下载 SteamCMD

SteamCMD 是 Valve 的一个 steam cmd 客户端,只具备一些基础功能,用来下载 CSGO 服务器。

首先我们要创建一个用户 steam,避免root的直接执行。

useradd -m steam
password steam

切换到 steam

su steam
cd ~
mkdir steamcmd
cd steamcmd

下载steamcmd 并解压

wget https://steamcdn-a.akamaihd.net/client/installer/steamcmd_linux.tar.gz
tar zxvf steamcmd_linux.tar.gz

创建一个update.txt自动下载脚本

vim update.txt

按I键开启编辑模式 复制以下内容进去

@ShutdownOnFailedCommand 1 
@NoPromptForPassword 1
login anonymous
force_install_dir ../csgoserver/
app_update 740
quit

保存

下载csgo服务端

./steamcmd.sh +runscript update.txt

服务器配置

下载好了之后还需要进行插件配置(sourcemod+metamod:source)以及服务器参数设置

https://www.sourcemod.net/downloads.php

http://www.metamodsource.net/downloads.php?branch=stable

把解压得到的addons跟cfg文件夹放到/home/steam/csgoserver/csgo/下

然后设置sourcemod管理员 addons/sourcemod/configs/admins_simple.ini

格式如

"STEAMID" "权限" "管理员密码(可选)"
"STEAM_1:1:59886493" "99:z"

随便进一个服务器 然后控制台打status

看到名字后面的STEAM_X:X:XXXXXX就是你的STEAMID

权限等级:

"a"//预留通道
"b"//管理员菜单的权限
"c"//踢人
"d"//BAN人
"e"//解BAN
"f"//娱乐命令(处死 火烧冰冻等)
"g"//更换服务器地图
"h"//修改服务器cvar参数
"i"//执行服务器cfg文件
"j"//发送消息
"k"//发动投票
"l"//给服务器上密码
"m"//rcon命令 远程控制服务器
"n"//修改sv_cheats参数以及使用其他作弊参数
"z" //顶级权限
"o-t" //自定义权限(warmod菜单等)

然后到csgoserver/csgo/cfg文件夹新建一个cfg文件比如autoexec.cfg 里面写入以下内容

hostname "你的服务器名称"
rcon_password "远程控制服务器的密码(与上面sourcemod里面的rcon不同)"
host_info_show 2
host_players_show 2
fps_max 1000
sv_region 4
sv_contact 你的邮箱 V社会做记录
exec banned_user.cfg
exec banned_ip.cfg
writeid
writeip

最后,如果你的服务器是需要改参数的,请新建一个文件叫 server.cfg,这样每次在加载模式后会修改参数。

脚本启动

使用脚本启动,在CSGOSever文件夹下,

vim run.sh

休闲模式

-game csgo -console -usercon +game_type 0 +game_mode 0

竞技模式

-game csgo -console -usercon +game_type 0 +game_mode 1

军备竞赛

-game csgo -console -usercon +game_type 1 +game_mode 0

爆破模式

-game csgo -console -usercon +game_type 1 +game_mode 1

死亡竞赛

-game csgo -console -usercon +game_type 1 +game_mode 2

写入以下内容

./srcds_run -console -game csgo -usercon -noipx -nohltv -steam_dir ../steamcmd -steamcmd_script ../steamcmd/update.txt -autoupdate +game_type 0 +game_mode 0 +map de_dust2

自动更新服务器

使用 crontab 设置自动更新

crontab -e
0 0 * * * /home/steam/steamcmd/steamcmd.sh +runscript update.txt

其他服务器启动项

-maxplayers_override 最大玩家数

-noipx 关闭IPX协议的支持

-nohltv 关闭gotv

-nobots 关闭bot功能! csgo如果想开某些不需要bot的服务器要加这个参数不然有人换队bot还是会占位!

-tickrate 128 设置服务器tick为128 满十必备

-authkey 如果要使用steam web API要用到这个启动项 apikey在这里申请:http://steamcommunity.com/dev/apikey

满十服务器

Warmod 插件是满十服务器最常用的一种解决方案。

官方地址 https://forums.alliedmods.net/showthread.php?t=225474

下载地址 https://warmod.bitbucket.io/plugins/warmod.smx

安装方法

将插件放在csgo/addons/sourcemod/plugins 下,然后配置将会自动启动。

run.sh 需要修改成这样

./srcds_run -console -game csgo -usercon -noipx -nohltv -steam_dir ../steamcmd -steamcmd_script ../steamcmd/update.txt -autoupdate +game_type 0 +game_mode 1 +map de_dust2

默认启动 Dust 2 地图。

KZ服务器

下次写

死斗服务器

下次写

CentOS 安装最新版的Wireguard

2017年,新一代VPN技术wireguard诞生。wireguard基于linux kernel内核运行,效率极高,速度很快,而且支持设备IP地址漫游功能,不仅适合服务器之间的互联,还适合在NAT环境下使用,包括家中的智能路由器,配合openwrt等路由器,可安装wireguard,实现路由器绑定wireguard代理功能。

其实我已经用Wireguard 很久了,但是一直没有时间去写如何配置,抽空写一篇博客来证明一下我自己还没死(


1. Wireguard 服务器配置

我用的是CentOS 7 64bit系统,而内核我使用的是 Linux 4.11.2-1.el7.elrepo 这个版本,因为这个版本是支持lotServer的,如果没有lotServer的授权,你也可以用nanqinglang 魔改版BBR。

首先先更新系统内核,我们执行以下命令

sudo yum update -y 
sudo rpm -ivh http://mirror.rc.usf.edu/compute_lock/elrepo/kernel/el7/x86_64/RPMS/kernel-ml-4.11.2-1.el7.elrepo.x86_64.rpm --force
sudo rpm -ivh http://mirror.rc.usf.edu/compute_lock/elrepo/kernel/el7/x86_64/RPMS/kernel-ml-devel-4.11.2-1.el7.elrepo.x86_64.rpm --force
sudo rpm -ivh http://mirror.rc.usf.edu/compute_lock/elrepo/kernel/el7/x86_64/RPMS/kernel-ml-headers-4.11.2-1.el7.elrepo.x86_64.rpm --force

设置 grub 来使使用新内核默认启动

sudo grub2-set-default 0
sudo grub2-mkconfig

启动完毕后我们加入 Wireguard 的 yum 源

sudo curl -Lo /etc/yum.repos.d/wireguard.repo https://copr.fedorainfracloud.org/coprs/jdoss/wireguard/repo/epel-7/jdoss-wireguard-epel-7.repo
sudo yum install epel-release -y
sudo yum install wireguard-dkms wireguard-tools -y

记得开启IPv4的转发

echo "net.ipv4.ip_forward = 1" >> /etc/sysctl.conf
sysctl -p

随后,使用命令创建Publickey和PrivateKey

mkdir /etc/wireguard
cd /etc/wireguard
wg genkey | tee privatekey | wg pubkey > publickey
chmod 777 -R /etc/wireguard
vim /etc/wireguard/wg0.conf

服务器端需要以下内容

[Interface]
Address = 10.0.0.1/24
ListenPort = 56660
PrivateKey = <Private Key>
PostUp = iptables -A FORWARD -i wg0 -j ACCEPT; iptables -t nat -A POSTROUTING -o eth0 -j MASQUERADE
PostDown = iptables -D FORWARD -i wg0 -j ACCEPT; iptables -t nat -D POSTROUTING -o eth0 -j MASQUERADE
SaveConfig = true

PrivateKey则是你刚生成的PrivateKey,需要填入进去。PostUP和PostDown是开启和关闭时分别执行的命令,你需要根据需求自行修改。

创建服务器端的自动启动

systemctl enable wg-quick@wg0

启动服务器端

wg-quick up wg0

至此,服务器端已经配置完毕,我们需要配置客户端


2.客户端配置

安装过程与服务器一直,但是配置文件是不一样的,具体的需要看你的需求。

假设我们需要将两台服务器互联,以便访问其内网中设备。我们的配置将如下:

[Interface]
Address = 10.0.0.2/24
ListenPort = 56660
PrivateKey = <Private Key>
PostUp = bash /etc/route-add 
PostDown = bash /etc/route-del
SaveConfig = true
 
[Peer]
PublicKey = <服务器端的Public Key>
AllowedIPs = 10.0.0.1/32
Endpoint = 服务器端的公网IP:56660

然后,这边需要注意的是AllowedIPs  如果你写了0.0.0.0/0,你可能会被全部reroute,从而导致连不上服务器。因此我这边推荐你设置为两边的IP先测试完毕再调全局。

随后一样的,启动wireguard。

在服务器端设置以下内容

wg set wg0 peer <客户端的Public Key> allowed-ips 10.0.0.1/32

然后你会发现两个内网IP可以互通,

ping -c 10 10.0.0.1
PING 10.0.0.1 (10.0.0.1) 56(84) bytes of data.
64 bytes from 10.0.0.1: icmp_seq=1 ttl=64 time=28.5 ms
64 bytes from 10.0.0.1: icmp_seq=2 ttl=64 time=28.4 ms
64 bytes from 10.0.0.1: icmp_seq=3 ttl=64 time=28.5 ms
64 bytes from 10.0.0.1: icmp_seq=4 ttl=64 time=28.5 ms
64 bytes from 10.0.0.1: icmp_seq=5 ttl=64 time=28.5 ms
64 bytes from 10.0.0.1: icmp_seq=6 ttl=64 time=28.3 ms
64 bytes from 10.0.0.1: icmp_seq=7 ttl=64 time=28.6 ms
64 bytes from 10.0.0.1: icmp_seq=8 ttl=64 time=28.6 ms
64 bytes from 10.0.0.1: icmp_seq=9 ttl=64 time=28.3 ms
64 bytes from 10.0.0.1: icmp_seq=10 ttl=64 time=28.5 ms

--- 10.0.0.1 ping statistics ---
10 packets transmitted, 10 received, 0% packet loss, time 9012ms
rtt min/avg/max/mdev = 28.360/28.522/28.688/0.207 ms

那么,我们的wireguard就算是通了,现在要仔细来调整这个路由让他来符合我们的需求。

就拿刚刚所说,如果是为了访问互相的内网,你需要把内网IP加入到 AllowedIPs  里面,用逗号区分。

比如说如下

[Interface]
Address = 10.0.0.2/24
ListenPort = 56660
PrivateKey = <Private Key>
PostUp = bash /etc/route-add 
PostDown = bash /etc/route-del
SaveConfig = true
 
[Peer]
PublicKey = <服务器端的Public Key>
AllowedIPs = 10.0.0.1/32, 192.168.0.0/16
Endpoint = 服务器端的公网IP:56660

在你启动wireguard后,你能访问到服务器端的192.168.0.0/16这个段,哦当然,这种可以认为是对等互联,所以不存在服务器或者客户端这种说法。

而另外一种做法,是在路由器上部署的,实现翻墙功能,这种配置应该是这么写的

[Interface]
Address = 10.0.0.2/24
ListenPort = 56660
PrivateKey = <Private Key>
PostUp = bash /etc/route-add 
PostDown = bash /etc/route-del
SaveConfig = true
 
[Peer]
PublicKey = <服务器端的Public Key>
AllowedIPs = 0.0.0.0/0
Endpoint = 服务器端的公网IP:56660
PersistentKeepalive = 25

另外一点,你需要编辑一下 /etc/route-add 来确保你的服务器IP不走wireguard,否则可能会连不上。

启动后,默认会将你所有流量都通过wg0这个接口到你的服务器上,实现翻墙。

3. Wireguard 的进阶玩法

这个以后再写,涉及到我目前做的一个项目,主要是给客户做游戏加速用,据说他们效果还不错。


具体就是开了一台机器作为他们的接入点,然后我们通过专线将流量导入到日本端,实现全天候稳定的游戏加速服务。

Wireguard只需要一个端口,只需要支持UDP并且内核支持,即可对接无数台VPS。

那么,聪明的人应该能想到一些东西了吧(这边先不公开了,等我玩腻了再说具体实现方案。